Bringing up the cooling issue with my girl...again...unfortunately

Thanks R.J. I'll have to go through and do as instructed....guess my work is cut out for me today, with all the GREAT responses, you'll all were kind enough to post. I'll then post back with my results. The bike's only got 11K on the ode, but I believe the bike has seen alot more outdoor weather, than was told, as the left and right hand control looked very weathered. Oh well, just another thing to keep me off the streets at night. Thanks again. Engine Ice is one slippery substance. You wouldn't think that, but wow, I did the two finger rub test and that stuff is worth it! I don't want to go through the entire flush system yet, as I spent all last season, working on this puppy....and I just want to ride, but I guess I'll have to go through and do as describe. I'll follow the shematic on the wiring harness and get to all the lil connectors and dilectric clean them and grease them....They say, the fastest running horse, will be the first one to kick ya...and that seems evident in this case as well.
 
Scoob, I just unscrewed it enough for coolant to dribble, and then a tiny bit more and I could clearly hear a "pppssssss" of air bubble purge. Then I looking for a clear stream with no bubbles in it and closed it back up.

You want to warm the bike up to operating temp and have coolant full when you do this. You may get better results if you do this one, then go to the one on the back of the t-stat right after.
 
Scoob, I just unscrewed it enough for coolant to dribble, and then a tiny bit more and I could clearly hear a "pppssssss" of air bubble purge. Then I looking for a clear stream with no bubbles in it and closed it back up.

You want to warm the bike up to operating temp and have coolant full when you do this. You may get better results if you do this one, then go to the one on the back of the t-stat right after.

I let the bike warm up enough, so that when I cut it off the fan turned on. I then unscrewed the bolt entirely and a lil bit dribble outta the hole...and I mean a lil. I thought that I would hear air, but nothing......hmmmm. The minute amount of coolant didn't flow, until I had the screw in my hand. I didn't realize that there was a bleeder on the back of the thermostat. I don't want to take the cap off, until it cools. I know that when it was cool, when I exchange gas tanks, that it was full to the brim. Wonder what I'm doing wrong....any idears?
 
Scooby, it says right on the bottle that it needs no other seal protection......Ready To Use!!!! When bleeding, no need to run or warm up! Per ZLMark..........fill through thermo to top, crack bleeder at water pump till you see coolant and tighten, then top off @ thermo then bleed air out @ thermo, the top off and should be good to go. I do this to the letter and never have any air in my systems at all. Be sure to get that resevoir out and cleaned out GOOD (baby bottle brush works great) and all the lines that attach to it. System has to be completely clean or you will contaminate the new Engine Ice!!!
 
Thanks R.J. I'll have to go through and do as instructed....guess my work is cut out for me today, with all the GREAT responses, you'll all were kind enough to post. I'll then post back with my results. The bike's only got 11K on the ode, but I believe the bike has seen alot more outdoor weather, than was told, as the left and right hand control looked very weathered. Oh well, just another thing to keep me off the streets at night. Thanks again. Engine Ice is one slippery substance. You wouldn't think that, but wow, I did the two finger rub test and that stuff is worth it! I don't want to go through the entire flush system yet, as I spent all last season, working on this puppy....and I just want to ride, but I guess I'll have to go through and do as describe. I'll follow the shematic on the wiring harness and get to all the lil connectors and dilectric clean them and grease them....They say, the fastest running horse, will be the first one to kick ya...and that seems evident in this case as well.


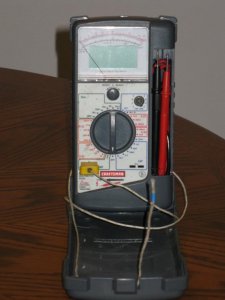
:hello: Scoob, do not worry about any inline resistors, there are none. What ever meter you use if needed do a continuity test on the leads. It should read @ 3 ohms. Also I use the 50/50 mix of vinegar & baking soda to flush all my radiators. You need a 1/2 cup of each for your bike radiator. What I do is I drain it, then put the mixture in then fill it with water. Bring the motor up to temp drain it. Then I do it 2 more times with just water. This I learned from a old school Ford Tech way back in the early 70s. This mixture gets all the slimy feeling out of the system. If it is real bad I run the garden hose through it also. My house water has a reverse osmosis system so I have no chemicals in my tap water. If you do not have a meter buy one with a temperature therm o couple lead. You can stick it inside of the radiator at the cap & re-install the cap & watch the temp. That way if it reaches over 250* you know to shut down the bike. After you get it up & running. Put the lead under the cap. Bring the temp up to 200* then shut the bike off & the fan should come on. Then start the bike up again let it come up to temp until the fan comes on. This should happen between 232* & 240*. You can leave the meter lead under the cap & rest the meter between your legs & test ride it. Your cruising temp should be between 190* & 220*. It all depends on the ambient temp. If the fan does not come on after turning off the bike the small relay under the tank is bad. If the fan does not turn on while the motor is running the large relay is bad. Both relays are under the right side of the tank. They are black & have a rubber protection sleeve over them. They are both still available from Kawasaki for @ $60 for both. Also on the back of the thermal stat housing the rear sensor can be disconnected & grounded to the frame & the fan will come on. Some people put a external switch here, but I do not like to do that because I always forget to turn it on. The cooling system is designed to run at a certain temp for peak performance & motor life. So personally I do not recommend a external switch. There is a way to test each relay in the circuit but I do not remember excellently what the procedure is. I can not find it. My son knows were it is. He found it on the internet but I never printed it out. If I think of anything else I will let you know. The meter I have with the temp setting is from Sears Craftsman Model # 82322. They are China junk so calibrate it by using ice 32*F & boil water 212* F. The first one I bought was off by 12* F.
 
Last edited:
:hello: Scoop, do what the other guys said first. That is the easiest. Only do what I have told you unless the other does not work. It took me an entire day cleaning & re-installing the wire harness. My original problem was a burned up fan. Then that lead me to the wire with the high resistance. Between all that I replaced both relays. They ended up bad. Before that I put in a new thermo stat & radiator cap. In all I spent 3 days on my cooling problem. Then in the end I put the hoses on the reservoir tank backwards. Make sure you do not do that.
 
I let the bike warm up enough, so that when I cut it off the fan turned on. I then unscrewed the bolt entirely and a lil bit dribble outta the hole...and I mean a lil. I thought that I would hear air, but nothing......hmmmm. The minute amount of coolant didn't flow, until I had the screw in my hand. I didn't realize that there was a bleeder on the back of the thermostat. I don't want to take the cap off, until it cools. I know that when it was cool, when I exchange gas tanks, that it was full to the brim. Wonder what I'm doing wrong....any idears?


I don't need the bike running do I? Not too much info, concerning the bleeding part of this sled....so, I unscrewed the bolt entirely, nothing really came out, (I'm suspecting an air bubble) But do I dare turn the bike on with the bolt out? Any instructions would be great. The thins it, when I had my tank off, I took the radiator cap off and it was full. I guess, I'll have to unscrew the bolt, not entirely and start it for a few seconds, while it's warm....kinda dangerous, but it seems that theirs and air bubble in the system, since it did not come flying outta the bleeder hole, or am I wrong.

Markus...that's a roger ghost rider.
 
I don't need the bike running do I? Not too much info, concerning the bleeding part of this sled....so, I unscrewed the bolt entirely, nothing really came out, (I'm suspecting an air bubble) But do I dare turn the bike on with the bolt out? Any instructions would be great. The thins it, when I had my tank off, I took the radiator cap off and it was full. I guess, I'll have to unscrew the bolt, not entirely and start it for a few seconds, while it's warm....kinda dangerous, but it seems that theirs and air bubble in the system, since it did not come flying outta the bleeder hole, or am I wrong.

Markus...that's a roger ghost rider.

:hello: The one at the bottom on the water pump I did with the bike off & the one on the back of the thermo stat housing I did with the bike running. Do both as mentioned after the bike is at operating temp.
 
These ZL's DO NOT need the bike running to bleed the cooling system. Can be bled completely when absolutely COLD!!!!
 
These ZL's DO NOT need the bike running to bleed the cooling system. Can be bled completely when absolutely COLD!!!!

:hello: Good to know. :thumbsup: I always thought it bled quicker & better if it was done at operating temp. None of my one lunger water cooled bikes have bleeders. I just crack the radiator cap to bleed it like I do on my truck.
 
They actually bleed better cold without the water pump moving the air around. Better to leave it trapped where it's supposed to be...........right by the bleeder so it all expells completely when opened.
 
They actually bleed better cold without the water pump moving the air around. Better to leave it trapped where it's supposed to be...........right by the bleeder so it all expells completely when opened.

:hello: That makes alot of since, :thumbsup: because air rises when not under pressure & is mostly at the top to began with. Thanks.
 
I'll let her cool down....nothing came out and I completely removed the screw, when warm.....hmmmm.

I didn't know there was a bleeder at the thermostat housing...or is there?

This has me really puzzled, as I got the bike warmed up, completely removed the bolt, nothing, cept a lil and I do mean trickle of Antifreeze came out. I'll let it set and see if any air comes out....if not, I"m going to have to completely flush the system, and dry, and fill with Engine Ice.

hmmmmm
 
Well.....I let her cool down....unscrewed the bleeder bolt, nothing came out...checked the fill level in radiator...it was full to the brim....left bleeder screw off, and started bike...looked like ALOT of air sputtered out...then revved it a lil and a lil and a lil, til I got a good amount to shoot out...closed the system. Started bike and waited, and waited, and waited and waited, and waited and waited....get the hint...no fans came on, but neither did the temp light....which is a good thing, but man, the engine was hot, as soon as I turned the bike off, the fan came on....I don't know whether to start throwing parts at this or not...

Maybe just replace both relays, both sensors and be done with it..

I guess, I'll have to let both me and the sled cool down and read through the posts that the pros posted and try to troubleshoot as to what's going on.

Oh well....starting the bike and revving it a lil, did show a lot of air coming outta the system...I just revved it a lil, til I got a good stream coming out and just put the screw back in while it was running, as I'm thinking about a vaccuum and what not..

I dunno...I'm just so tired of working and not riding...I'll wait til dark and go out and try to blow it up....hehehehe
 
Well.....I let her cool down....unscrewed the bleeder bolt, nothing came out...checked the fill level in radiator...it was full to the brim....left bleeder screw off, and started bike...looked like ALOT of air sputtered out...then revved it a lil and a lil and a lil, til I got a good amount to shoot out...closed the system. Started bike and waited, and waited, and waited and waited, and waited and waited....get the hint...no fans came on, but neither did the temp light....which is a good thing, but man, the engine was hot, as soon as I turned the bike off, the fan came on....I don't know whether to start throwing parts at this or not...

Maybe just replace both relays, both sensors and be done with it..

I guess, I'll have to let both me and the sled cool down and read through the posts that the pros posted and try to troubleshoot as to what's going on.

Oh well....starting the bike and revving it a lil, did show a lot of air coming outta the system...I just revved it a lil, til I got a good stream coming out and just put the screw back in while it was running, as I'm thinking about a vaccuum and what not..

I dunno...I'm just so tired of working and not riding...I'll wait til dark and go out and try to blow it up....hehehehe

:hello: It takes a long time to reach 250* & that is when the over temp light comes on. Go to Sears & buy the mulimeter with the temp option. They are $80. If you do not want it, then take it back when you are done using it. All that you need to do is place the thermo couple wire inside then put the radiator cap back on & run the bike up to temp when the motor heats up to @ 240* F the fan should come on. If not the large relay is bad. What I did in the end was install a temp & volt meter. They are easy to install & have really easy instructions to follow with pics. www.daytonameters.com www.kosometers.com The Sears Craftsman meter thermocouple probe wire lead is @ 3 ft. long & can be easily placed & secured in the thermostat housing while running the bike. All that is needed is to make sure the tip is in the coolant just past the blue marking. If buying a temp gauge I found that the Daytonameters temp meter has the best visibility of all three that I have tried. It was $95 with tax. Daytonameters makes a bracket for there meters that mount in the center of your bikes handle bars at any of the 4 bolts that hold your bars to the upper triple tree & it is @ $10.
 

Attachments

  • IMG_0790.jpg
    IMG_0790.jpg
    91.5 KB · Views: 7
  • IMG_0793.jpg
    IMG_0793.jpg
    79.4 KB · Views: 7
  • IMG_0800.jpg
    IMG_0800.jpg
    63.1 KB · Views: 6
  • IMG_0822.jpg
    IMG_0822.jpg
    104.1 KB · Views: 7
  • IMG_0828.jpg
    IMG_0828.jpg
    81.7 KB · Views: 8
  • IMG_0184.jpg
    IMG_0184.jpg
    56.4 KB · Views: 5
  • IMG_0858.jpg
    IMG_0858.jpg
    40 KB · Views: 7
Last edited:
:hello: It takes a long time to reach 250* & that is when the over temp light comes on. Go to Sears & buy the mulimeter with the temp option. They are $80. If you do not want it, then take it back when you are done using it. All that you need to do is place the thermo couple wire inside then put the radiator cap back on & run the bike up to temp when the motor heats up to @ 240* F the fan should come on. If not the large relay is bad. What I did in the end was install a temp & volt meter. They are easy to install & have really easy instructions to follow with pics. www.daytonameters.com www.kosometers.com

:hello: Some members have sent me P Ms about my meters. So here is a description of what I did. This is for ZL 1000 only. First thing I did was fabricate a mounting bracket from a piece of aluminum bar stock for all 3 meters. It is 6"tall, 2" wide & 1/8" thick. Daytonameters also makes a mounting bracket for about $10. It mounts to the handle bar mount. Second I placed all 3 meters on the plate marked & drilled 1/8" holes for zip ties to hold the wiring. Then I placed the zip ties through the holes. Next I made a 2 hole plate drilled & tapped it with 1/4 20 tap. I used 2 SS 3/8" long allen cap screws. I made it so it fits between the 2 screw holes of the plastic cover that mounts on the back side of the fuel/indicator light unit. Then I placed the small bracket on the mounting plate, marked & drilled it using a 5/16" bit. Centered & aligned them on the plastic cover then bolted it all together. Then placed a one piece of velcro (plastic portion)on the 6" plate. Next I put the fuzzy part of the velcro on the back side of each of the meters & placed the meters on the 6" plate. Next I screwed the plastic plate on the back of the dash indicator/fuel indicator unit. Then I routed all the wires down the right side of the frame. Next followed all the instructions to hook up the 3 meters. www.daytonameters.com www.kosometers.com The wire leads are rather long on the meters so what I did was neatly rolled each wire up put a zip tie on each one then placed them neatly under the main frame tube under the fuel tank. I drilled & tapped the frame to the left of my inline fuel filter for all the ground wires (see pic # 9) using a SS 1/4 20 button head allen screw. I ran each ground wire separately. The prices on my digital meters are as follows Tach $135. Temp $95 & Volt Meter $45.
 

Attachments

  • IMG_0184.jpg
    IMG_0184.jpg
    56.4 KB · Views: 3
  • IMG_0856.jpg
    IMG_0856.jpg
    34.3 KB · Views: 4
  • IMG_0828.jpg
    IMG_0828.jpg
    81.7 KB · Views: 3
  • IMG_0822.jpg
    IMG_0822.jpg
    104.1 KB · Views: 3
  • IMG_0816.jpg
    IMG_0816.jpg
    98.1 KB · Views: 2
  • IMG_0800.jpg
    IMG_0800.jpg
    63.1 KB · Views: 2
  • IMG_0793.jpg
    IMG_0793.jpg
    79.4 KB · Views: 2
  • IMG_0790.jpg
    IMG_0790.jpg
    91.5 KB · Views: 2
  • IMG_0788.jpg
    IMG_0788.jpg
    50.2 KB · Views: 2
Last edited:
I've got a 900, but I can fabricate something. I'll have to read through it, but I just got up. I sleep when I can, and now I'm up as a pup, I'll go reload some ammo and maybe that will put me back to sleep. Thanks R.J. I'll read through these and then I'll take some sort of action. Take care and thank you.
 
With you having to take that bolt all the way out like that, it tells me you've got some corrosion in the bolt or cavity that's keeping it from bleeding properly. Don't put Engine Ice in there with any corrosion.
 
With you having to take that bolt all the way out like that, it tells me you've got some corrosion in the bolt or cavity that's keeping it from bleeding properly. Don't put Engine Ice in there with any corrosion.

:hello: Question. Is it impossible to get all the corrosion out of the cooling system in a bike that is over 25 years old. I was told to say away from the Engine Ice in older bikes not to take a chance in contamination of the old coolant & that it was unnecessary. I was recommend to use PEAK 50/50 from my friend Ron & who is a retired Kaw/Honda Tech. The PEAK is sillcate & phosphate free. Just wanted another opinion. Thanks.
 
I will only do a vinegar flush on mine......takes all corrosion out! Search for the procedure, it's easy! I do three flushes with it and then de-ionized water after the last one to get all the vinegar water out of it. Then blow dry with a air nozzle through all openings to get as much water out as possible. Then you're ready for Engine Ice. The key is to let the vinegar work by warming the engine completely, letting it cool down and draining good in between flushes. Do it till you see no more corrosion.........then do it once more! If a tiny bit of de-ionized water is left in there, it shouldn't hurt since that's what the factory uses to dilute the Engine Ice.
 
Back
Top