The 79 Firebird Esprit slow build thread

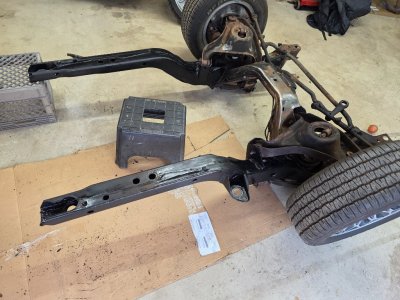
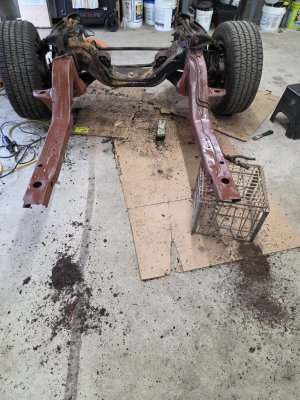
Got at the captured nut. The hole in the frame on this side was large enough to fit the upper bushing through. Hopefully the front 2 mounts come out without drama.20260405_145121.jpg 20260405_143843.jpg 20260405_144247.jpg

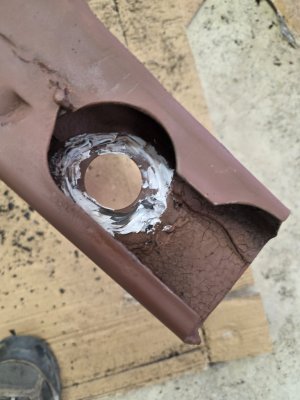
Stuffed a screwdriver in to hold the nut from spinning. Since the interior is still in and I don't want to burn down the house with melting metal and textiles, an "Access hatch" will be pop riveted in place over the hole after I am done fixing the frame.
20260405_132134.jpg 20260405_132108.jpg

I must have been prepping for a system. I have an alpine amp, dual 8" sub and a head around here. I think we may be going full mullet!
 
The frame and body are divorced. The cages spot welds are broken on both firewall mounts. A 1 3/8" wrench slipped in and grabbed the square nut, I guess that's how I will reassemble too. Time to get the ZL out of the way and wheel out the frame for some cleanup. All 4 body mounts need weld repair on the frame.

20260405_171544.jpg

20260405_171156.jpg 20260405_160631.jpg 20260405_171530.jpg
 
Cleaned up enough to start cutting, patch parts are here now. I've been researching suspension, talk about a rabbit hole. I think complete steering component replacement, delrin bushings for upper and lower control arms, longer upper ball joints, quality lowers, a sway bar with delrin bushings.

20260412_135026.jpgI don't think I want it lowered and have the exhaust drag or give up a compliant ride. Probably will get stock springs (unless I go for a slight drop out front and use a progressive coil) and bilstein shocks. I can always use lowering blocks out back. Most likely will never see big rims so no need for control arms in my eyes.20260412_142622.jpg
Dirty thankless job!
 
:hello: You are at the point of no return. LOL. You are now in it to WIN! You are doing really good work. I have a tip for you. If you paint anything black I found out WALMART brand paint in the a rattle can works great. $2.50 a can. It dries in five minutes and can be wet sanded and buffed the next day. They sell it in black, flat black and white. They uses to sell it in twelve colors back in 1980 when it was 79cents a can. LOL. To show how good the cheap paint is from Walmart here are pics of my 1991 ingersoll rand compressor that I rebuilt four years ago. _______________________________________________________________________________ 20260414_122440~2[1].jpg20260414_122416~2[1].jpg
 
Last edited:
20260416_211338.jpg20260416_211334.jpg

My buddy that knows his way around a welder much better than I took care of buisness. We decided to hog out the holes enough to clear the lower bushings then set on the repair plate and fillet weld. It ain't no rare bird to put all that fitting into for 1/8" that can be accounted for with shims.
 
Did some seam sealer on the underside gaps of the frame patches and floor patches. Rustoleum primed the floor and frame that's bolting to the body. If you don't topcoat within an hour it is a 48hr wait for primer to cure otherwise it can wrinkle and trash the job. Pulled some wire from my legs, one was under my skin 1 1/2", the grinder with a wire wheel is no joke. Still pretty heavy to flip. The control arm bushings are shot so suspension is getting blown apart when frame mates with body. Still determining if individual parts or a kit gets installed.
 

Attachments

  • 20260425_135101.jpg
    20260425_135101.jpg
    106 KB · Views: 4
  • 20260425_131353.jpg
    20260425_131353.jpg
    288.5 KB · Views: 4
  • 20260425_140622.jpg
    20260425_140622.jpg
    287.5 KB · Views: 4
Now I am going in deeper into the corners (and my wallet) than original plans entailed. I ordered a little something....~5 weeks lead time. Teaser...

In that time I hope to get the motor/trans in and start on the exhaust.
 
:hello: I know all about it. My 2003 yamaha YFM 390 XR stroker motor sport quad with a stage two hot cam has set me back thousands. The Elka stage three shocks cost $1350.
 
Brushed on some flat black rustoleum. Hit some areas of the firewall and patched areas of the floor while with the brush while it was wet. Can't do too much in a day otherwise the hobby turns into a job. Finish looks nothing like RJs compressor, but it's a heck of alot better than it was.:)
 

Attachments

  • 20260428_182044.jpg
    20260428_182044.jpg
    202.6 KB · Views: 3
  • 20260428_182028.jpg
    20260428_182028.jpg
    182.9 KB · Views: 3
Not exactly, used the bucket to backstop the a arms when I popped the ball joints. I left a couple of inches between the arm and bucket. Pop - bang.
 
20260503_154356.jpg20260503_154227.jpg20260503_154216.jpg

Found a way more gooder engine stand at the swap meet for an agreeable price. The other one was very springy with the full assy on it. It was a crappy weekend for swap meet with flurries in the AM and rain threatening. Nothing else was found except some fender nuts that I will need during reassemble. Looks like a goodmark inner fender and patch the wheel lip on the original fender unless one shows up nearby. Most other things that were available were more expensive than the internet could provide.
 
It was shiny and new 20 years ago haha. Some love for the stang, the battery relocation kit I used has 1ga cable, I upgraded the alternator and added a double belt to it. The Spal fan and electric fuel pump would eat batteries, optima red, agm, it didn't matter, this one is rated even better and priced accordingly but I got 20% off on a Napa promo.20260506_195723.jpg

Getting ready to bang out some miles on the mustang.
 
Replaced the rag joint and made the shaft Purdy. I sometimes am astonished of the time that goes into the little things. That slip joint under the plastic cover in the middle was frozen, no wonder it was a battle to remove. Getting anti-sieze before reassemble. 20260507_184409.jpg
 
20260516_160857.jpg162039b9-fac9-4564-916e-d3de413cf526.jpg20260517_112702.jpg20260517_133248.jpg

Some paint. Thinned down rustoleum brushed for the frame, not a sand blasted/sprayed frame but better than before. Wire wheel for fuel line and some silver spray bomb. Shiney engine paint for the clips. Tailpipes given to me years ago are for 3rd gen, probably going Pypes crossflow system to gain some clearance over hanging 2 mufflers in front of axel. Budget what is a budget.
 
Back
Top